
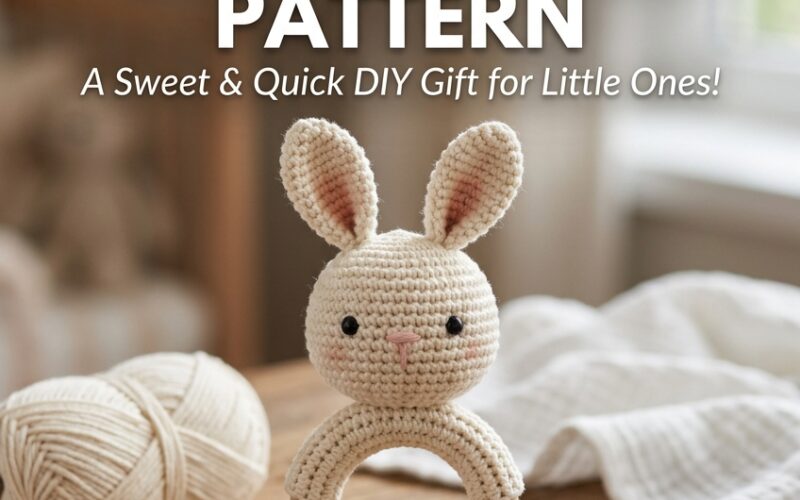
A handmade crochet baby bunny teether ring is a sweet and practical project for anyone who enjoys making thoughtful gifts for babies. Combining a soft crocheted bunny head with a smooth wooden ring, this beginner-friendly pattern creates a charming accessory that is easy to customize with different colors and simple details.
Whether you are preparing a baby shower gift, making something special for a newborn, or adding a new project to your crochet collection, this easy crochet baby bunny teether ring pattern is a lovely place to start. The design uses basic amigurumi techniques, simple stitches, and a wooden ring to create a soft bunny-inspired accessory.
Before beginning, remember that teething accessories require particular care. Use only materials specifically suitable for baby products, and have the finished item assessed for applicable toy and teething-product safety requirements. Handmade crochet items are not automatically safe for unsupervised infant use.
Materials You Will Need
Gather the following supplies before starting your crochet baby bunny teether ring.
- Baby-friendly cotton yarn in your preferred color
- A small amount of contrasting cotton yarn for the inner ears
- A 2.5 mm or 3 mm crochet hook, depending on your yarn
- A smooth, untreated wooden ring specifically intended for baby products
- Fiberfill stuffing suitable for the intended product
- A yarn needle
- Stitch markers
- Scissors
- A measuring tape
Cotton yarn is a popular choice because it is breathable, durable, and available in many gentle colors. Cream, beige, dusty pink, sage green, and soft gray are beautiful options for a handmade bunny design.
Choose materials based on the applicable safety requirements for baby products. Avoid decorative buttons, beads, glued-on features, loose accessories, and plastic eyes that could become choking hazards.
Skill Level and Finished Size
This project is suitable for crocheters who understand basic amigurumi techniques.
Skill level: Beginner to intermediate
Techniques used: Magic ring, single crochet, increases, decreases, chain stitches, and slip stitches.
The finished size will depend on your yarn, hook, and ring dimensions. As a starting point, you can make a small bunny head approximately 2–3 inches wide, but the dimensions must be checked against the safety requirements for the intended product.
Abbreviations
This pattern uses standard US crochet terminology.
- MR: Magic ring
- sc: Single crochet
- inc: Increase, two single crochet stitches in one stitch
- dec: Decrease, preferably invisible decrease
- sl st: Slip stitch
- ch: Chain
- st: Stitch
- FO: Fasten off
Work in continuous rounds unless otherwise stated. Place a stitch marker in the first stitch of every round to keep track of your progress.
Step 1: Crochet the Bunny Head
Begin with the bunny head using your main yarn color.
Round 1: Make a magic ring and crochet 6 sc into the ring. (6 stitches)
Round 2: Work 2 sc in each stitch around. (12 stitches)
Round 3: Repeat 1 sc, inc around. (18 stitches)
Round 4: Repeat 2 sc, inc around. (24 stitches)
Round 5: Repeat 3 sc, inc around. (30 stitches)
Rounds 6–9: Sc in every stitch around. (30 stitches)
Round 10: Repeat 3 sc, dec around. (24 stitches)
Round 11: Repeat 2 sc, dec around. (18 stitches)
Add a small amount of fiberfill stuffing, keeping the head firm enough to hold its shape without overfilling it.
Round 12: Repeat 1 sc, dec around. (12 stitches)
Round 13: Dec around. (6 stitches)
Fasten off, leaving a long yarn tail. Close the remaining opening securely and weave in the yarn end.
Check the head carefully for holes, loose stitches, and exposed stuffing. The head should be evenly shaped, with no loose yarn tails.
Step 2: Make the Bunny Ears
The long ears give this crochet bunny its recognizable appearance. Make two matching ears using your main yarn color.
Round 1: Make a magic ring and work 6 sc into it. (6 stitches)
Round 2: Repeat 1 sc, inc around. (9 stitches)
Rounds 3–10: Sc in every stitch around. (9 stitches)
Rounds 11–14: Continue working sc around, or adjust the length to create the shape you prefer.
Fasten off, leaving a long tail for sewing.
Repeat the instructions for the second ear. Keep both ears approximately the same length so the bunny looks balanced.
Flatten the lower end of each ear and sew it closed securely. For a decorative variation, you can crochet a small inner-ear panel in a contrasting color and attach it before joining the ears to the head.
Keep any contrasting yarn securely enclosed and ensure that no small piece can loosen during use.
Step 3: Attach the Bunny Ears
Position the two ears on the upper part of the bunny head. You can place them upright for a classic bunny look or angle them slightly outward for a relaxed appearance.
Using the yarn tails and a yarn needle, sew each ear to the head with multiple secure passes through the fabric. Knotting alone is not sufficient; the yarn ends should be secured and concealed within the crochet fabric.
Gently test the attachment by hand and inspect the surrounding stitches. If the fabric stretches, gaps appear, or the seam begins to loosen, reinforce the attachment before proceeding.
For a minimalist design, leave the bunny face plain. This avoids additional decorative parts and gives the project a simple, handmade finish.
Step 4: Prepare the Wooden Teether Ring
Choose a smooth wooden ring designed and manufactured specifically for baby products. Inspect it for cracks, splinters, rough areas, and other defects before use.
The ring should not be treated with an unknown coating, paint, varnish, or finish. Follow the manufacturer’s cleaning and care instructions.
Do not assume that an ordinary craft ring is safe for a baby simply because it is made from wood.
Step 5: Join the Bunny Head to the Ring
Position the bunny head against the upper part of the wooden ring. The attachment must be secure and must not create long loops, gaps, or detachable parts.
A crocheted connector can be made by chaining a short length of yarn, then working single crochet stitches back along the chain. However, the connector’s dimensions and attachment method must meet the applicable safety requirements for baby products. Do not rely on a simple yarn loop or an improvised knot as proof of safety.
Sew the connector securely to the bunny head and attach it to the ring only using a method appropriate for the intended product. Avoid loose cords and accessible yarn tails.
If you plan to sell or gift the finished item for infant use, have the design and attachment assessed against the relevant safety standards before describing it as a baby teether.
Step 6: Finishing Touches
Inspect the entire project carefully. Check every seam, the bunny ears, the wooden ring, and all yarn ends.
Make sure there are no loose decorative pieces, sharp edges, exposed stuffing, or areas where a baby’s fingers could become trapped. Do not add buttons, beads, safety eyes, bells, or glued decorations.
For a decorative keepsake rather than a functional teether, you can add embroidered facial details using securely concealed yarn ends. Clearly distinguish a decorative crochet accessory from a product intended for mouthing.
Tips for a Beautiful Crochet Baby Bunny
Keep your tension consistent. Tight, even stitches help create a neat amigurumi shape and prevent stuffing from showing through.
Choose soft, coordinated colors. Neutral shades work beautifully for handmade baby gifts, while pastel colors provide a gentle spring-inspired look.
Count every round. A stitch marker makes it easier to maintain the correct stitch count and avoid uneven shaping.
Prioritize construction over decoration. Secure seams and suitable materials are more important than extra details, particularly when making an item intended for infants.
Follow appropriate safety guidance. A handmade teether should never be assumed safe based on appearance alone. Use it only if the complete product meets the applicable requirements, and always follow the supervision and care instructions provided for the product.
Frequently Asked Questions
Is this crochet baby bunny teether suitable for beginners?
The crochet head and ears use common amigurumi stitches, making them manageable for beginners who know how to increase and decrease. The attachment and safety requirements make the complete teether more challenging than an ordinary crochet toy.
What yarn works best for a crochet bunny teether?
Cotton yarn is a common choice for crochet accessories, but the yarn must also meet the requirements for the intended product. Check the manufacturer’s specifications rather than relying on softness alone.
Can I use a plastic ring instead of wood?
Only use a ring specifically designed and tested for the intended baby product. An ordinary plastic or wooden craft ring should not be substituted without confirming its suitability.
Can I sell handmade crochet bunny teethers?
Potentially, but selling a product intended for infant use may involve testing, labeling, documentation, and other legal requirements. Check the rules that apply in your country and the markets where you plan to sell.
Final Thoughts
This easy crochet baby bunny teether ring pattern is a charming project that combines basic amigurumi techniques with a simple bunny-inspired design. The rounded head, long ears, and neutral color options make it a lovely idea for handmade baby-gift collections.
Take your time with each step, keep your stitches consistent, and inspect every attachment carefully. Most importantly, treat baby-product safety as an essential part of the design process. With appropriate materials and professionally verified construction, your handmade bunny design can become a thoughtful addition to a baby-gift collection.
