
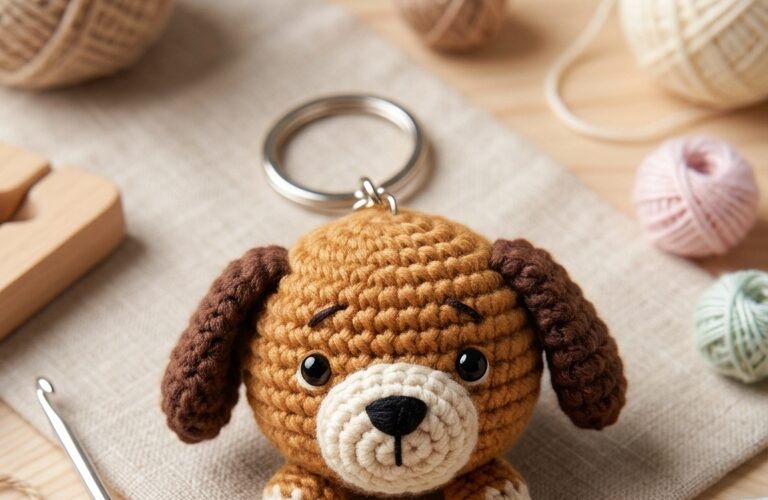
If you love handmade accessories and adorable crochet projects, this crochet puppy keychain is a wonderful project to try! With its tiny body, floppy ears, sweet embroidered face, and little paws, this miniature puppy makes a charming addition to your keys, backpack, purse, or pencil case.
The best part is that this project is beginner-friendly. You only need a few basic crochet supplies and some simple stitches to create your own little puppy. You can also customize the colors, ear shapes, and facial details to make every puppy unique.
Whether you want to make a thoughtful handmade gift, create accessories for a craft fair, or enjoy a relaxing afternoon of crocheting, this easy DIY pattern is a great place to start.

Why You’ll Love This Crochet Puppy Keychain
This tiny puppy is a fun project for crocheters of different skill levels, especially beginners who want to practice amigurumi techniques.
- Beginner-friendly: The pattern uses basic crochet stitches and simple shaping.
- Quick to make: Its small size makes it a manageable project for a free afternoon.
- Easy to customize: Choose your favorite yarn colors and create different puppy styles.
- Perfect for gifts: Handmade keychains are thoughtful gifts for friends, family members, and dog lovers.
- Great for using leftover yarn: Small amounts of yarn are usually enough for one puppy.
You can make a classic brown puppy, a white fluffy-looking dog, a black-and-tan puppy, or even a colorful fantasy-inspired version.
Materials You’ll Need
Gather these supplies before starting your crochet puppy keychain.
- Worsted-weight or DK yarn in your chosen main color
- Small amounts of contrasting yarn for the ears, muzzle, and paws
- A crochet hook suitable for your yarn, usually around 2.5–3.5 mm
- Polyester fiberfill stuffing
- A yarn needle
- Stitch marker
- Scissors
- Keychain ring or lobster clasp
- Embroidery thread for the eyes, nose, and mouth
For a child-friendly version, embroider all facial details instead of using plastic safety eyes or other small detachable pieces. Secure the keychain hardware firmly and inspect the finished item before use.
Crochet Abbreviations
This beginner pattern uses the following common abbreviations:
- MR: Magic ring
- sc: Single crochet
- inc: Increase, or two single crochet stitches in one stitch
- dec: Decrease, preferably an invisible decrease
- sl st: Slip stitch
- st(s): Stitch or stitches
- FO: Fasten off
The pattern is worked in continuous rounds unless otherwise stated. Do not join rounds unless instructed.
Easy Crochet Puppy Keychain Pattern
This pattern creates a small, rounded puppy head with floppy ears and a simple muzzle. The finished size will depend on your yarn, hook, and tension.
Step 1: Crochet the Puppy Head
Using your main yarn color, begin with a magic ring.
Round 1: Make 6 sc into the magic ring. (6 stitches)
Round 2: Work 2 sc into each stitch around. (12 stitches)
Round 3: Repeat 1 sc, inc around. (18 stitches)
Round 4: Repeat 2 sc, inc around. (24 stitches)
Rounds 5–8: Sc in every stitch around. (24 stitches per round)
Round 9: Repeat 2 sc, dec around. (18 stitches)
Begin adding a small amount of stuffing while the opening is still easy to reach.
Round 10: Repeat 1 sc, dec around. (12 stitches)
Add a little more stuffing, keeping the head soft but firm.
Round 11: Dec around until the opening closes. Fasten off and weave in the yarn end securely.
You should now have a small, rounded puppy head. If you notice gaps between stitches, try using a slightly smaller hook.
Step 2: Make the Floppy Ears
Choose a contrasting color or use the same yarn as the head.
For each ear, make a magic ring and work 6 sc into it.
Round 2: Inc in every stitch around. (12 stitches)
Rounds 3–4: Sc around. (12 stitches per round)
Fasten off, leaving a long yarn tail for sewing.
Make two ears. Flatten them gently and position one on each side of the puppy’s head. Sew them securely in place, adjusting their angles to create a playful, floppy-ear look.
For a different style, use longer ears or make one ear slightly folded before attaching it.
Step 3: Crochet the Little Muzzle
Using cream, white, or another contrasting color, make a magic ring.
Round 1: Work 6 sc into the ring. (6 stitches)
Round 2: Inc in every stitch around. (12 stitches)
Fasten off, leaving a long tail.
Add a tiny amount of stuffing if desired, then sew the muzzle onto the lower front of the head. Keep the stitching neat so the muzzle sits securely against the face.
Step 4: Add the Puppy Face
Use dark embroidery thread or thin yarn to create the puppy’s nose, mouth, and eyes.
Embroider a small triangular or oval nose near the top of the muzzle. Add a short line underneath to create a simple smiling mouth.
Position the eyes evenly above the muzzle. Small embroidered eyes give the puppy a sweet expression while keeping the design simple.
Before finishing, check that both eyes are level and that the nose is centered. A few small details can make a big difference in the final appearance.
Step 5: Make the Tiny Paws
To create four little paws, use your chosen paw color.
For each paw, make a magic ring and work 6 sc into it. Pull the ring closed, then fasten off, leaving a long sewing tail.
Make four pieces. Arrange two near the lower front of the head and two toward the sides or bottom, depending on the look you prefer. Sew them securely in place.
For an even simpler beginner version, you can skip the paws and make a rounded puppy-head keychain instead.
Step 6: Attach the Keychain Ring
Choose a sturdy keychain ring or lobster clasp.
Use a strong length of yarn to create a small attachment loop at the top of the puppy’s head. Reinforce the loop with several secure stitches, then connect it to the keychain hardware.
Alternatively, crochet a short chain, fasten it into a loop, and sew it firmly to the top of the head.
Give the attachment a gentle pull to check its strength. The keychain should remain securely connected when handled normally.
Helpful Tips for Beginner Crocheters
Keep your stitches tight. Amigurumi looks best when the stuffing cannot easily show through the stitches. If your work has visible gaps, try a smaller crochet hook.
Use a stitch marker. Continuous rounds can be difficult to count at first. Mark the first stitch of each round to keep track of your progress.
Stuff gradually. Adding small amounts of fiberfill as you work helps prevent lumps and makes the head easier to shape.
Sew the pieces carefully. Take your time attaching the ears, muzzle, and paws. Secure sewing creates a neat finish and helps the puppy keep its shape.
Experiment with colors. Brown, cream, gray, black, and white are classic puppy colors, but pastel shades can give your handmade accessory a playful look.
Creative Ways to Customize Your Puppy Keychain
Once you’ve completed the basic design, you can make several variations without changing the entire pattern.
Create a spotted puppy by embroidering small patches onto the head. Make a golden puppy with darker floppy ears, or use two shades of brown for a more detailed appearance.
You can also experiment with different ear lengths, add a tiny crocheted collar, or embroider a small heart on the front. A miniature bow made from yarn can create another distinctive style.
If you’re making several keychains as gifts, try using different colors to represent different dog breeds. You could even create a matching collection for friends who love dogs.
How to Care for Your Crochet Puppy Keychain
To keep your handmade accessory looking its best, avoid pulling on the ears or keychain attachment. If the yarn becomes dusty, gently spot-clean the puppy with a damp cloth and mild soap suitable for the yarn.
Allow it to air-dry completely before attaching it to your keys or bag again. Avoid harsh scrubbing, which can distort the stitches or damage the embroidered details.
Store the keychain somewhere dry when not in use, especially if you’ve used cotton yarn or other materials that absorb moisture.
Final Thoughts
This adorable crochet puppy keychain is a simple and rewarding DIY project for beginners. With a few basic stitches, some leftover yarn, and a little patience, you can create a personalized accessory that is both practical and charming.
The pattern is easy to adapt, so don’t be afraid to experiment with different colors, floppy ears, embroidered expressions, and tiny paws. Every variation can give your puppy its own personality.
Make one for yourself, create a handmade gift for a dog-loving friend, or crochet a small collection in different colors. Once you’ve mastered the basic design, you may find yourself coming up with even more miniature animal keychain ideas to try next!
