
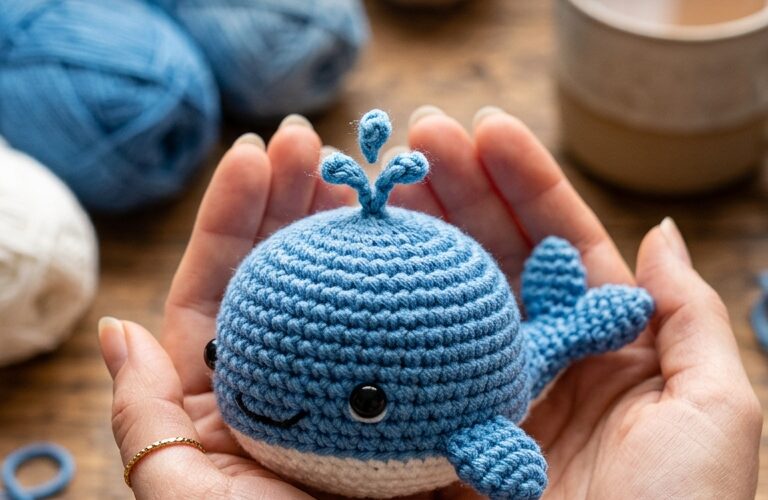
Crocheting a mini whale is a fun and beginner-friendly project that creates an adorable handmade decoration, gift, or small amigurumi toy. With its rounded body, tiny tail, and simple fins, this little whale is perfect for anyone who wants to practice basic crochet skills while making something special.
This easy crochet whale pattern uses basic stitches, simple shaping, and a small amount of yarn. Even if you are new to amigurumi, you can follow the step-by-step instructions to create your own miniature whale. Choose classic blue yarn, soft gray, pastel pink, or any color you love to personalize your finished project.
Why You Will Love This Mini Crochet Whale
A mini crochet whale is an excellent project for beginners because it does not require complicated stitches or large amounts of materials. The body is worked in continuous rounds, and the small fins and tail are easy to make separately.
Here are a few reasons to try this pattern:
- Beginner-friendly: Practice single crochet, increases, and decreases.
- Quick to make: A small whale can often be completed in an afternoon.
- Uses leftover yarn: You only need a small amount of yarn for the body and details.
- Easy to customize: Change the colors, add cheeks, or embroider a smiling face.
- Great handmade gift: Make a whale for a friend, a nursery decoration, or an ocean-themed collection.
Materials You Will Need
Gather these supplies before starting your mini whale amigurumi:
- DK or worsted-weight yarn in blue, teal, gray, or your preferred color
- A crochet hook suitable for your yarn, usually 2.5–3.5 mm for a small, firm amigurumi
- Polyester fiberfill stuffing
- Yarn needle for sewing and weaving in ends
- Stitch marker
- Scissors
- Black embroidery thread for the eyes and optional mouth
For a child-friendly toy, embroidered eyes are a good alternative to plastic safety eyes. Always ensure the finished toy is securely assembled and appropriate for the intended age.
Crochet Abbreviations
This tutorial uses standard US crochet terminology.
- MR: Magic ring
- sc: Single crochet
- inc: Increase, making two single crochets in one stitch
- dec: Invisible decrease, combining two stitches into one
- sl st: Slip stitch
- st(s): Stitch or stitches
- FO: Fasten off
Work the body in continuous rounds unless otherwise stated. Place a stitch marker in the first stitch of each round to help you keep track of your progress.
Step 1: Crochet the Whale’s Body
The whale’s body is worked from the top toward the underside, creating a rounded oval shape. Use your main yarn color.
Round 1: Make a magic ring and crochet 6 sc into the ring. (6 stitches)
Round 2: Work 2 sc in each stitch around. (12 stitches)
Round 3: Repeat 1 sc, inc around. (18 stitches)
Round 4: Repeat 2 sc, inc around. (24 stitches)
Rounds 5–8: Sc in each stitch around. (24 stitches per round)
At this point, the body should resemble a small rounded dome. Continue with the shaping rounds to close the underside.
Round 9: Repeat 2 sc, dec around. (18 stitches)
Round 10: Repeat 1 sc, dec around. (12 stitches)
Begin adding small amounts of fiberfill stuffing. Distribute it evenly so the whale keeps a smooth, rounded shape without becoming too firm.
Round 11: Dec around. (6 stitches)
Cut the yarn, leaving a tail. Thread the yarn through the remaining front loops and pull gently to close the opening. Weave in the end securely.
Tip: Stuff the body before the opening becomes too small. Adding stuffing gradually makes it easier to achieve an even shape.
Step 2: Make the Two Side Fins
The whale’s little side fins give it its recognizable silhouette. Make two matching fins using the same yarn as the body or a contrasting shade.
Round 1: Make a magic ring and crochet 4 sc into it. (4 stitches)
Round 2: Repeat 1 sc, inc around. (6 stitches)
Round 3: Sc in each stitch around. (6 stitches)
Fasten off, leaving a long sewing tail. Flatten each fin slightly and use your fingers to shape it into a small rounded triangle. There is no need to stuff the fins.
Make sure both fins are approximately the same size so the whale looks balanced when viewed from the front.
Step 3: Crochet the Tail
The tail is one of the most recognizable features of a mini whale. Create two small rounded lobes and attach them together at the base.
Make two small tail pieces using your main yarn color.
Round 1: Make a magic ring and crochet 5 sc into the ring. (5 stitches)
Round 2: Sc in each stitch around. (5 stitches)
Fasten off the first piece. For the second piece, leave a long sewing tail.
Place the two pieces side by side and sew them together along their inner edges, joining them at the base to create a simple two-lobed tail. Adjust the shape with your fingers so both lobes spread slightly outward.
If you prefer an even simpler beginner version, crochet a small flat oval or teardrop-shaped tail and sew it securely to the back of the whale.
Step 4: Assemble Your Mini Whale
Now it is time to bring all the pieces together.
- Attach the fins: Sew one fin onto each side of the body, positioning them slightly below the middle.
- Attach the tail: Sew the tail securely to the back of the whale, angling the two lobes outward.
- Add the eyes: Use black embroidery thread to stitch two small eyes on the front of the body. Keep them level and evenly spaced.
- Embroider a smile: Add a short curved line beneath the eyes if you want your whale to have a friendly expression.
- Check the shape: Gently adjust the fins and tail so they sit evenly.
Take your time with the placement. Even a small change in the position of the eyes can give your whale a different expression.
Step 5: Customize Your Crochet Whale
One of the best things about making amigurumi is the freedom to personalize every project.
Try these simple variations:
- Pastel whale: Use pale blue, lavender, mint, or blush pink yarn.
- Ocean whale: Choose navy blue or teal with a white underside.
- Tiny keychain whale: Make a slightly smaller version and add a securely attached keychain fitting for adult use.
- Whale family: Create several whales in different sizes and colors.
- Blushing whale: Embroider two small pink cheeks using a little contrasting yarn.
For a two-color whale, crochet the main body in blue and add a small white or cream belly patch. Crochet the patch separately and sew it neatly onto the underside.
Tips for the Best Amigurumi Results
Keep your stitches tight. Amigurumi usually looks best when the stuffing cannot be seen through the stitches. If you notice gaps, try a smaller hook.
Use a stitch marker. Continuous rounds can be difficult to count, especially when working on a small project.
Stuff gradually. Add small amounts of fiberfill rather than one large piece. This helps prevent lumps and uneven shaping.
Check your stitch counts. Count each round carefully to keep the body symmetrical and avoid accidental increases or decreases.
Secure every piece. Weave in yarn ends and sew the fins and tail firmly in place. If making a toy for a young child, avoid detachable parts and follow appropriate toy-safety practices.
Frequently Asked Questions
How long does it take to crochet a mini whale?
Most beginners can finish this project in approximately one to two hours, depending on their crochet speed and how much time they spend assembling the pieces.
What yarn is best for a crochet whale?
Smooth cotton or acrylic yarn is a good choice because it makes the stitches easy to see and produces a neat finish. Choose a yarn you can comfortably work with using a small hook.
Can beginners make this whale?
Yes. The pattern uses basic single crochet, increases, decreases, and simple sewing. Familiarity with a magic ring is helpful, but beginners can also use an alternative adjustable starting method.
How can I make my whale smaller?
Use thinner yarn and a smaller crochet hook. You can also reduce the number of body stitches, but remember to adjust the shaping rounds to maintain a rounded form.
Final Thoughts
This mini crochet whale is a simple, enjoyable amigurumi project that is ideal for beginners and experienced crocheters alike. With a rounded body, tiny side fins, and a playful tail, it is a lovely way to turn a little leftover yarn into something handmade.
Follow the instructions one round at a time, take care when attaching the small pieces, and experiment with different colors to create your own whale design. Once you have finished your first whale, you may want to make a whole collection of miniature sea creatures to display, gift, or add to your next crochet project.
