
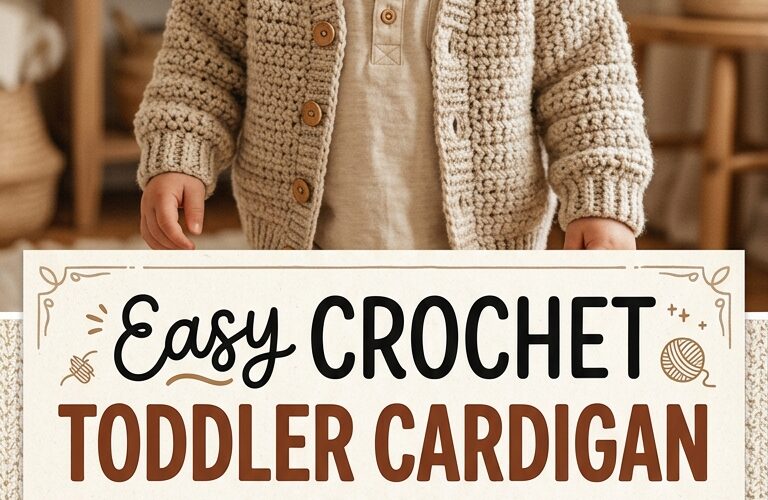
An easy crochet toddler cardigan is a wonderful handmade project for keeping little ones warm and comfortable. With simple stitches, soft yarn, and a beginner-friendly construction, you can create a cozy cardigan that works beautifully for everyday wear, family outings, and thoughtful handmade gifts.
This easy crochet toddler cardigan pattern uses basic crochet techniques and simple shaping, making it suitable for beginners who want to try making their first garment. The cardigan is worked in separate panels and assembled with minimal sewing. You can customize the colors, sleeve length, and buttons to create a unique piece for your toddler.
Materials You Will Need
Before starting your crochet toddler cardigan, gather the following supplies:
- Yarn: Approximately 250–400 grams of soft, washable DK or light worsted-weight yarn, depending on the size.
- Crochet hook: 4.5 mm or the size needed to match your gauge.
- Buttons: Three or four lightweight buttons.
- Yarn needle: For sewing the panels together and weaving in ends.
- Scissors: For cutting yarn.
- Stitch markers: Helpful for marking armholes and sleeve placement.
- Measuring tape: To check the cardigan’s dimensions.
Choose a soft yarn that feels comfortable against sensitive skin. Machine-washable yarn is especially practical for toddler clothing because it makes cleaning easier. Pastel shades, cream, sage green, dusty blue, and warm beige are excellent choices for a timeless design.
Crochet Abbreviations
This pattern uses standard US crochet terminology.
- ch: Chain
- sc: Single crochet
- hdc: Half double crochet
- dc: Double crochet
- sl st: Slip stitch
- st: Stitch
- rep: Repeat
The cardigan is made using half double crochet stitches for the main fabric, with single crochet stitches around the edges for a neat finish.
Finished Size and Gauge
This beginner pattern is designed as an adjustable toddler cardigan, approximately suitable for ages 2–3 years.
- Chest circumference: Approximately 22–24 inches.
- Body length: Approximately 12–14 inches.
- Sleeve length: Approximately 9–11 inches.
These measurements are estimates, not guaranteed age-based sizing. Measure your toddler’s chest, arm length, and preferred cardigan length before beginning.
For gauge, aim for approximately 14 half double crochet stitches and 10 rows per 4 inches (10 cm). Make a small swatch first and adjust your hook size if necessary.
Step 1: Crochet the Back Panel
Begin by making a foundation chain of 46 stitches. This is a starting estimate for the suggested size, so adjust the chain to suit your gauge and desired width.
Row 1: Work one half double crochet into the third chain from your hook. Continue working one half double crochet into each remaining chain.
Row 2: Chain 2 and turn. Work one half double crochet into each stitch across the row.
Repeat Row 2 until the panel measures approximately 12–14 inches long, or your preferred body length.
Fasten off and leave a long yarn tail if you plan to use it for sewing. The back panel should form a simple rectangle with straight edges.
Step 2: Make the Two Front Panels
The front panels are worked separately and should each measure approximately half the width of the back panel, allowing for a comfortable fit and front opening.
Chain approximately 24 stitches, adjusting the number to match your finished back panel.
Work the first row in half double crochet, then continue repeating the same row until the front panel matches the back panel’s length.
Make a second identical panel.
For a cardigan with a deeper neckline, you can gradually decrease a few stitches along the inner edge near the top. However, a straight rectangular design is easier for beginners and creates a relaxed, comfortable style.
Place both front panels against the back panel to check that their widths align before continuing.
Step 3: Crochet the Sleeves
Make two matching sleeves.
Chain approximately 30 stitches, or enough to fit comfortably around your toddler’s upper arm without stretching tightly.
Work one row of half double crochet into the chain. Chain 2, turn, and continue working half double crochet stitches across each row.
Continue until the sleeve measures approximately 9–11 inches, or the desired length.
For a gently tapered sleeve, decrease one stitch near each end of a row every few rows until you reach the desired wrist width. Keep both sleeves the same length and width.
Fold each sleeve lengthwise and lightly check its fit before fastening off.
Step 4: Assemble the Cardigan
Lay the back panel flat and position the two front panels on top, with their outer edges aligned.
Use a yarn needle and matching yarn to sew each shoulder seam, leaving enough space between the shoulders for the neckline.
Next, attach the sleeves to the body. Center each sleeve along the shoulder seam and sew its top edge to the body, working carefully so the fabric does not bunch.
Fold the cardigan with the right sides facing inward. Sew the side seams from the bottom hem toward the underarm, then sew the sleeve seams from the wrist toward the armpit.
Turn the cardigan right side out and check that the sleeves sit evenly. If the garment feels tight under the arms, undo the affected seam and allow a little more room.
Step 5: Add the Edging
A neat border helps the cardigan look polished and gives the front opening a more structured finish.
Join your yarn near the bottom edge of one front panel. Work single crochet stitches evenly up the front, around the neckline, and down the opposite front edge.
Continue around the bottom hem if desired.
At the corners, work two or three single crochet stitches into the same space when necessary to keep the border flat. Avoid adding too many stitches, as this can make the edges ruffle.
For a ribbed-looking hem and cuffs, alternate front-post and back-post double crochet stitches, or use simple rows of single crochet.
Step 6: Attach the Buttons
Choose three or four lightweight buttons that complement your yarn color.
Sew the buttons securely along one front edge, spacing them evenly from the chest toward the lower body. On the opposite edge, create matching buttonholes by making a small chain space within the edging and skipping the same number of stitches.
Check that each button passes comfortably through its buttonhole without making the front gape.
For toddler clothing, inspect all buttons regularly and make sure they are firmly attached. If the cardigan is intended for a very young child or the buttons could become loose, consider a button-free design or another secure closure.
Tips for a Better Crochet Toddler Cardigan
Check the fit as you work. Toddler sizes vary considerably, so use measurements rather than relying only on age labels.
Keep your tension consistent. Uneven stitches can cause panels and sleeves to differ in size.
Choose practical yarn. Soft, washable yarn is ideal for garments that need frequent cleaning.
Customize the design. Try contrasting cuffs, colorful stripes, a textured collar, or a simple embroidered motif to make the cardigan special.
Prioritize comfort and safety. Avoid scratchy yarn, long loose ties, and detachable decorations that could pose a choking hazard. Inspect seams and fastenings before every wear.
Frequently Asked Questions
Is this crochet toddler cardigan suitable for beginners?
Yes. The pattern uses basic stitches, rectangular panels, and straightforward seams. Beginners who know how to make chains and half double crochet stitches should find the construction manageable.
How much yarn do I need?
Plan for approximately 250–400 grams of yarn for the suggested size. Larger sizes, longer sleeves, thicker yarn, and textured stitches may require more.
Can I make this cardigan in a different size?
Absolutely. Measure the child’s chest and desired length, then adjust the width and length of each panel. Make a gauge swatch first to calculate how many stitches you need.
Can I make it without buttons?
Yes. You can leave the cardigan open at the front or use a suitable secure closure designed for children’s clothing.
Final Thoughts
This easy crochet toddler cardigan pattern is a practical way to create a handmade garment with a personal touch. Its simple panels, beginner-friendly stitches, and customizable details make it a rewarding project for crocheters who want to move beyond smaller accessories.
Choose a soft yarn, check your measurements, and work at a comfortable pace. With careful assembly and a few finishing touches, you can create a lovely toddler cardigan that is warm, versatile, and made with love.
